Enter Marked Register Data
Connect Mananger Essentials
This Quick Sheet will show you how to add data from your Marked Register to Connect. It will show you how to export your base file, mark it up, and then import the data. To make your campaigning more effective in future, it is useful to know who does and doesn’t vote. Storing the Marked Register in Connect will make it easier to prioritise your campaigning and maximise the use of your resources. Where The Marked Register Export button is in the Advanced section of the left hand side of the Main Menu screen. The Bulk Upload button is on the right-hand side of the Main Menu Screen.
Creating your export file
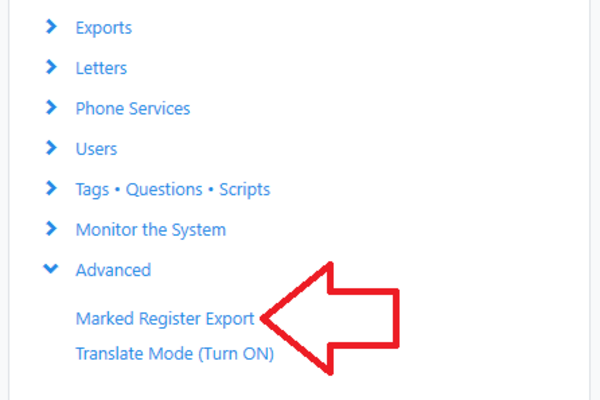
The first stage to adding your Marked Register data is to export a file from Connect. This file will include the VAN IDs and poll numbers of all the voters who were eligible to vote on Polling Day. From the Main Menu, on the left hand side, click Advanced and then click on Marked Register Export.
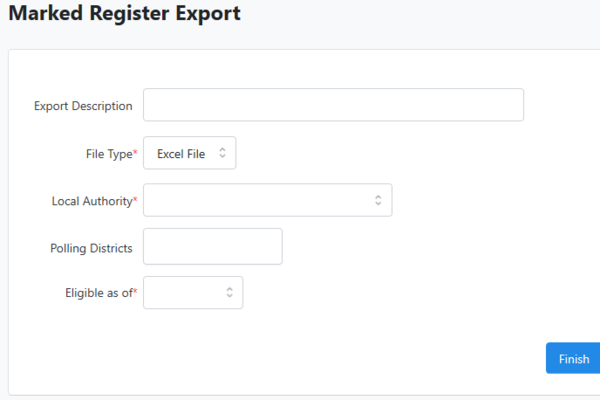
The Marked Register Export Screen will then open. Here, you can choose your options for export. You can choose the Local Authority and Polling District(s) you wish to export. You can also select the file type, and specify a name for the export file.
It is important that you select the correct date in the ‘Eligible as of’ box. The dates refer to how the register appeared in Connect on that date. If your register was up to date for your election, then you should select the date immediately before your polling day. If your final update was not uploaded until later, you should select the date after it was uploaded. Because of late registrants, it is likely that the export will not be identical to the marked register. This is nothing to worry about.
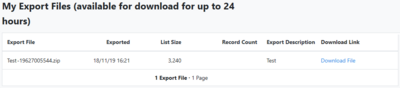
To download the file, click on the ‘My Export Files’ link.

On the Export files page, click ‘Download File’ and save the file to your computer.
Marking the Voted Data
Once you have downloaded your file, simply open it in your preferred spreadsheet software. The file contains columns showing each voter’s Polling District, Polling Number, VAN ID and their name. There is then an empty column called Voted?.
Simply mark the Voted? column with a consistent character (e.g. the letter ‘y’ or ‘Yes’) for those who voted, according to the copy of the Marked Register provided by your Local Authority.
You should also request the marked register for Postal Voters from your Local Authority. This is normally available as a data file. If you can only get a paper copy, you can mark them in the same spreadsheet with a different letter (e.g. p). If you get an electronic copy, you do not need to copy it to a spreadsheet. You can load it in the bulk uploader directly. You can only mark Register History in Connect with a file that contains VAN IDs, so you will need to save it as a Saved List (the final option in the Bulk Upload drop down menu). You can then export that list from the My List screen to create a file with VAN IDs. You can then use this file to upload the Marked Register data.

Uploading your file
To upload your file, click on Run Bulk Uploads on the Main Menu and then click Upload a New File.
Click Select a File to locate your saved Marked Register file. Once you have chosen your file, make sure the First row contains column header information box is checked. Click Next to upload the file. Your file will then be uploaded, and a sample of the data will be displayed.
You must tell Connect which column in your file contains the VAN ID. From the Apply New Mapping menu, select VAN ID. In the pop up box, select the column called VAN ID and click Next.
Next you need to tell Connect how you want it to map the Voting History data. From the Apply New Mapping menu, select Apply Voting History. In the pop up box, you first need to select the appropriate election. Simply type the year of election and a range of options will be displayed for you to select. Use the up and down arrows on your keyboard to choose the correct election and a further ‘Voted’ section will appear. Type the election the data applies to here (start with the year). Select ‘Choose Column from Data file’ and pick ‘Voted?’. Choose which symbol refers to those who voted and which refers to those who voted by post (Absent). Here, you must select ‘Choose column from Data File’ and pick ‘voted?’ In the drop down file. Click ‘Next’ to load the matching screen. In the first column will be displayed the letters you used to mark people in your data file. For each, simply select the data you wish that to relate to (either Voted or Absentee) in the drop down menus. Once you have matched the VAN Ids and the Marked Register data, click ‘Finish’ on the Bulk Upload Wizard screen.
Completing the Match
Once you have matched the data for the Marked Register input, you will need to complete the match. To do so, return to the Main Menu, click Run Bulk Uploads and then click ‘Administer Bulk Upload Batches’. You should then see your upload on the screen. Here you can cancel your upload if you have made a mistake. Click on the ‘Match People’ link on the left hand side (if this isn’t a link, wait a minute or two then click refresh). Connect will show you how many of the uploaded records it has matched to voters in the database. You can choose to export back out the records that did not match if you would like to review them. This will create a CSV file, available from the ‘My Export Files’ page (See page 2). Click ‘Next’ and then click ‘Finish’ to confirm the upload. You can then check the progress of your upload on this screen. The ‘View’ drop down box at the top will allow you to see completed batches instead of, or as well as, incomplete ones.
Processing Postal Marked Registers
Unlike normal marked registers, councils will often be able to supply the full postal marked register as a csv or excel file. This makes it far easier to upload than the in person marked register, however it does require some extra steps
A VANID match is required to bulk upload voting history, a bulk upload on the polling numbers alone will not allow you to map it. There are many ways that you can link the polling numbers to VANIDs. We will highlight one option using the bulk upload feature in Connect below
Important: In order to bulk upload a Postal Marked register, you must ensure that the polling numbers in Connect match the polling numbers the election was run on! This means that if your election was held prior to your local full register update, typically done in mid-December, you will need to export the marked register data using the Marked Register Export function in Connect, and match the VANIDs using Excel
Bulk Upload Method
- First filter your list in Excel to make sure that it only includes people who voted. This can be most easily done by filtering the list on Excel, then copying and pasting this filtered list into a new spreadsheet
- Go to Run Bulk Uploads and upload your new list
- In the Apply New Mapping dropdown menu, select Polling Number. Then select a Local Authority, and map the columns containing the Polling District and Polling Number. These must be in two separate columns. If they are not, you can split this using the “Text to Columns” feature in the Data menu of Excel
- In the Apply New Mapping menu, apply “Save as Saved List” and save it to a folder
- Load the saved list and export it. The export will need to contain the VANIDs, but does not need any other fields
- Bulk upload the exported list back into Connect. Map VANID onto the VANID column
- Go to the Apply New Mapping menu and select Apply Voting History
- Simply type the year of election and a range of options will be displayed for you to select. Next select “Absent” beside “Apply One Value to all Records,” since you will have already filtered your list in step 1
- Finally complete the match! To do so, return to the Main Menu, click Run Bulk Uploads and then click ‘Administer Bulk Upload Batches’. You should then see your upload on the screen. Here you can cancel your upload if you have made a mistake. Click on the ‘Match People’ link on the left hand side (if this isn’t a link, wait a minute or two then click refresh). Connect will show you how many of the uploaded records it has matched to voters in the database. You can choose to export back out the records that did not match if you would like to review them. This will create a CSV file, available from the ‘My Export Files’ page (See page 2). Click ‘Next’ and then click ‘Finish’ to confirm the upload. You can then check the progress of your upload on this screen. The ‘View’ drop down box at the top will allow you to see completed batches instead of, or as well as, incomplete ones