Encryption
You can download a copy of this guidance in full here.
What is Encryption and Password Protection?
Data can be “password protected”. This generally means that the data is stored in a readable format, but to access it using the normal application, you need to enter a password. However, there may be other applications or methods in which you can read the data without the password.
When data is “encrypted”, the data is scrambled and unreadable by any method, unless the password is entered.
When you store or share data it must be encrypted, not just password protected.
Choosing Good Passwords
Passwords should only be used once. In particular you should not re-use a password that you have used to login to any internet accounts.
You should use a password that is a mix of numbers, lowercase letters and uppercase letters, and is at least 8 characters long.
If you use a Password Manager, for example, Last Pass, 1Passwd or Apple’s Keychain, then these tools can generate good, random passwords. This is not necessary for encrypting individual files that will be deleted after a short period of time. However, they do make it easier to create new passwords each time you need to encrypt a new file.
Sharing Passwords
If you need to share a password, you must do so via a different method from sharing the encrypted file itself. So, if you email an encrypted file as an attachment, or send the link to it, then the password must not be sent by email.
Passwords should instead be sent by text message, phone call, or a secure messaging platform, such as WhatsApp. More information on sharing data and passwords can be found in other guidance on the GDPR Guidance Page.
Encrypting Files
The easiest way to encrypt data is encrypting individual data files.
Encrypting Documents in Excel and Word
Microsoft Office versions since 2010 have supported encryption of individual documents. If you can download data, make use of it and then delete it, then use that method. If you need to save the data overnight, then you should encrypt it.
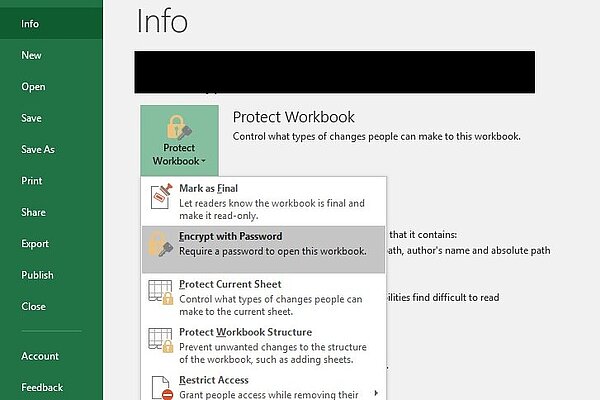
In Excel and Word, Select File > Info > Protect Workbook / Document > Encrypt with a Password. Enter your chosen password and save the document. If you have downloaded the file as a CSV (Comma Separated Values) or as a text file, you will need to save the document as an Excel Workbook or Word Document.
Password Protection in Microsoft Office
You can also add Passwords to protect an Office Document, to restrict who can read and who can modify a document. THIS IS NOT ENCRYPTION. Whilst you can continue to use this feature, it must be done in addition to Encrypt with Password, not instead of.
Encrypting Documents in LibreOffice
LibreOffice is a free alternative to Microsoft Office. All documents that are saved from LibreOffice in OpenDocument format can be encrypted with a password. Documents that are saved with a password are encrypted and cannot be opened without the password.
If you can download data, make use of it and then delete it, then use that method. If you need to save the data overnight, then you should encrypt it.
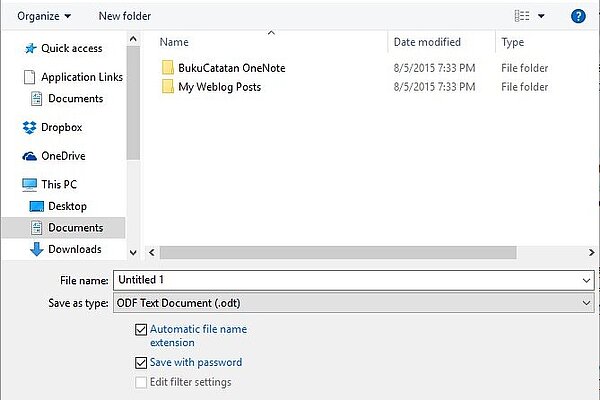
To turn on protection, choose File > Save As and mark the Save with password check box. Save the document and enter your chosen password when prompted.
Encrypting Other Documents
Other files can also contain personal data. For example, PDFs with lists of people, photographs and media files. These also need to be encrypted. The tools for viewing and editing these do not generally have built in encryption.
There is encryption software that will handle any sort of document, including Microsoft Office and LibreOffice documents, as well as PDFs and media files.
The recommended software below uses the same encryption for both Windows PCs and Macs, and therefore files can be shared between the two.
Encrypting Files on a Windows PC
The recommend software is 7-zip. Download the latest version of 7-Zip at www.7-zip.org. Try the 64-bit version first as that should work unless you have an old PC. Double click on the downloaded file and follow the instructions to install.
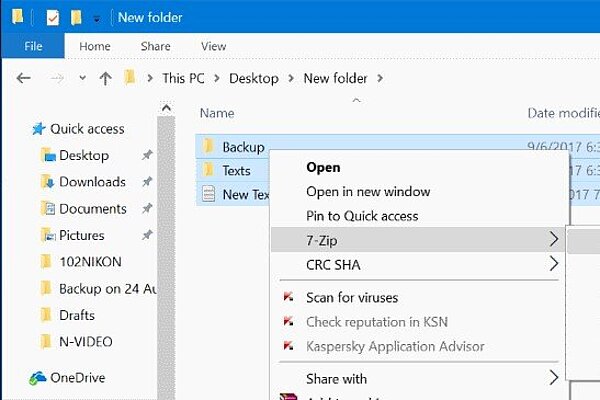
To encrypt a file, folder or set of folders, select them in Windows Explorer. Right-click and select 7-zip > Add to archive….
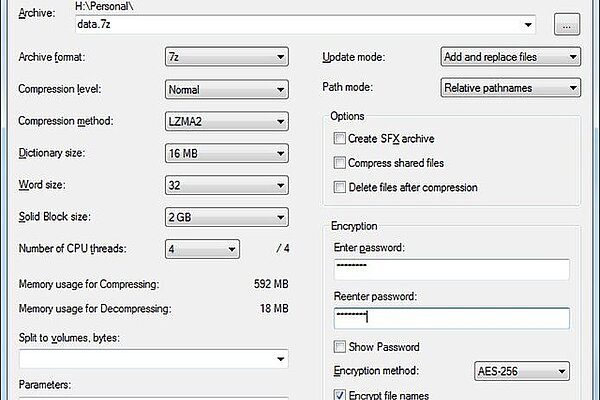
In the window that appears, enter the password you have chosen in the Encryption section, and re-enter the password in the field below. Then hit OK. The 7-zip archive of the files you have selected should appear in the same folder in Windows Explorer.
Technical Considerations
We recommend using the “7z” Archive format with AES-256 encryption method. These are the default settings in 7-zip.
If you use the “zip” format, then the default encryption method is “ZipCrypto”. This is a weak encryption method and you are advises NOT to use it. You can use the AES-256 method with zip files, but there is no advantage in doing so. If you share a zip file with AES-256, the recipient will still need 7-zip or WinZip to open it. WinZip is a paid for product.
It is therefore easier to use the default 7z format and AES-256 encryption method. If you need to share this file, you will need to let the recipient know that they need to download 7-zip for Windows or Decompressor for Mac. See below for download links, or see the Sharing Data Guidance for more information.
Unencrypting Files on a Windows PC
The recommended software is 7-zip. Download the latest version of 7-Zip at www.7-zip.org. Try the 64-bit version first as that should work unless you have an old PC. Double click on the downloaded file and follow the instructions to install.
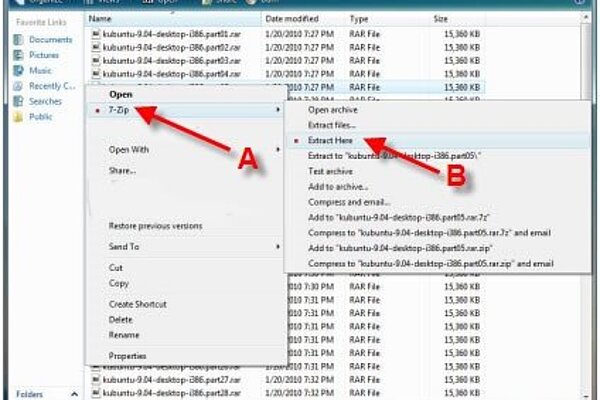
To open an encrypted 7-zip archive, select the file in Windows Explorer. Right click on the file and select 7-Zip > Extract Here.
You will be prompted for a password. Enter the password that you have been given and the files will appear in the same folder as the 7-zip file.

Encrypting Files on a Mac
The recommended software for encrypting files on a Mac is Keka. This has a modest cost of £1.99 at the Mac App Store. You can purchase and download Keka here: https://itunes.apple.com/gb/app/keka/id470158793?mt=12
If you do not need to encrypt files, but only open encrypted files that have been sent to you, then the recommended software is Decompressor, which is free on the Mac App Store. You can download Decompressor here: https://itunes.apple.com/gb/app/decompressor/id1033480833?mt=12
Open Keka, and use the default format, 7z. Enter the password you have chosen. Select “Exclude Mac resource forks”
Drag and drop the files you want to encrypt from Finder on to the Keka window, or application icon in the Dock.
Unencrypting Files on a Mac
If you need to encrypt files, then you can simply use Keka as well. Double click on the archive in Finder and you will be prompted for the password.
If you do not need to encrypt files, but only open encrypted files that have been sent to you, then the recommended software is Decompressor, which is free on the Mac App Store. You can download Decompressor here:
https://itunes.apple.com/gb/app/decompressor/id1033480833?mt=12
Double click on the archive file in Finder to open it, and you will be prompted for the password.
Files will appear in the same folder as the encrypted archive file.
Full Disk Encryption
Again, we would recommend that you do not store data on your PC outside of the approved systems. If you need to store a lot of data on your computer, then you can encrypt the entire disk on your computer.
On a Windows PC you can use BitLocker for Full Disk Encryption. On a Mac you can use File Vault.
Full Disk Encryption on a Windows PC
Full Disk Encryption is not always available on Windows PCs. For the simplest method to turn it on, you will need to have a PC with Windows 10 Pro installed. The computer also needs a Trusted Platform Module (TPM), which is a special piece of hardware in the computer. If you are not using Windows 10 Pro, or do not have a TPM module, the instructions below will not work, and you will need to seek advice and support for how to add Full Disk Encryption to your Windows PC.
Windows 10 Pro includes software called BitLocker for encrypting your hard drive.
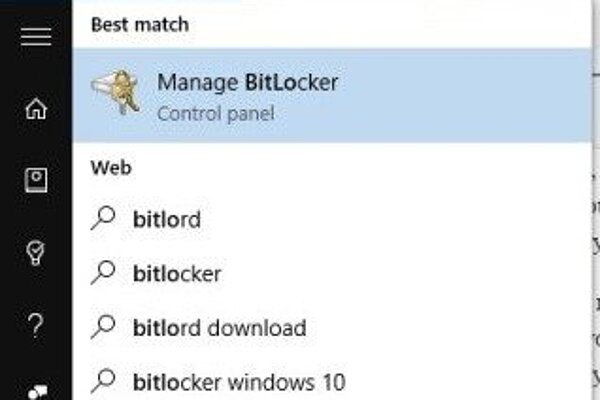
Go to the Start Menu (with the Windows logo in the bottom left hand corner) and type “BitLocker” in the Search field that appears.
Select Manage BitLocker that will appear in the search results. If this does not appear it may be that you do not have Windows 10 Pro.
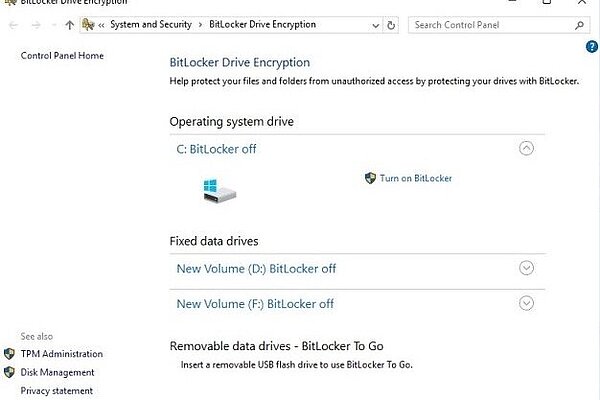
In the BitLocker Control Panel that will appear, select “Turn On BitLocker” for the disk drive where you are going to store Lib Dem data. Normally this will be the C: Drive.
Again, if you do not see this option, then you might not have Window 10 Pro or a Trusted Protection Module installed on your computer.
Follow the instructions and make sure that you record the Recovery Key. We recommend that you write down or print out the Recovery Key and file it in a safe place, away from where you keep your computer.
Full Disk Encryption on a Mac
Full Disk Encryption has been supported on all Macs for quite some time. Unless you have a very old Mac, these instructions should work.
Full Disk Encryption on a Mac is called File Vault and can be switched on in System Preferences.
You will need to turn on using a login and password for your Mac if you have not done so already.
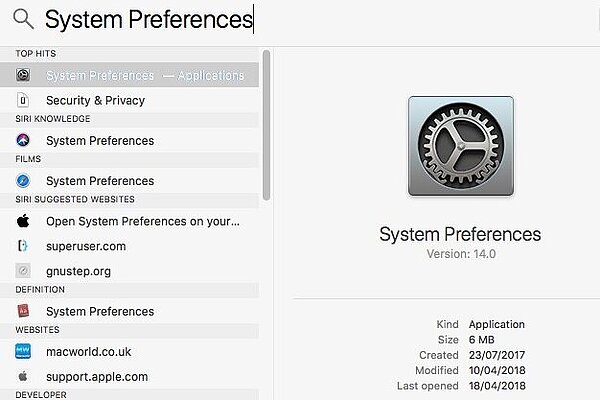
Open System Preferences. This is the application with the gear icon in your Dock. Otherwise you can search for it by clicking on the search magnifying glass icon in the top right hand corner of your computer. Type “System Preferences” in the search field and open the application that appears in the search results.
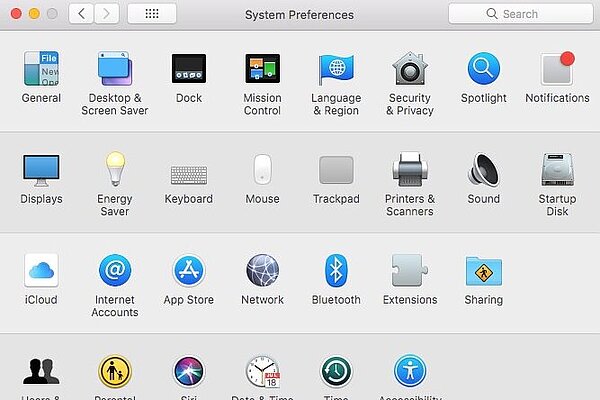
In System Preference, click on the “Security & Privacy” icon
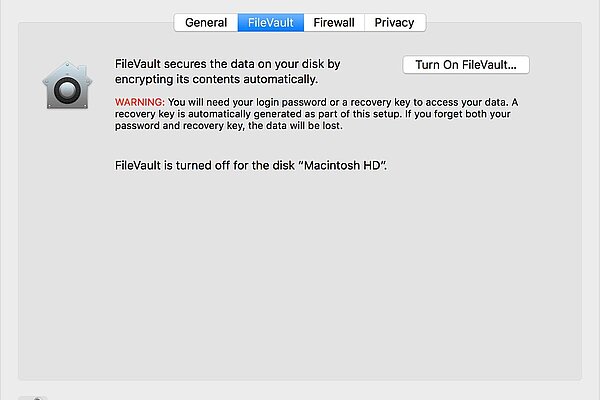
Then select the “FileVault” tab and then click on the “Turn On File Vault…” button.
Follow the instructions and make sure that you record the Recovery Key. We recommend that you write down or print out the Recovery Key and file it in a safe place, away from where you keep your computer.
Mobile Device Encryption
You may also be storing data on your mobile devices, so we recommend they are encrypted as well. Encrypting an entire device is easier than encrypting individual files on mobile devices. Therefore, it is recommended that mobile devices, such as phones and tablets be fully encrypted.
Encrypting Apple Devices
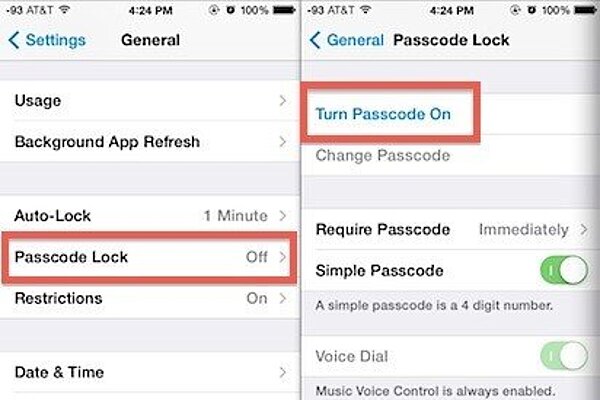
All mobile Apple Devices, such as iPhones and iPads are fully encrypted by default. You must however turn on a passcode for the device, so that the data is not directly accessible if you lose your device.
To turn on the passcode, go to Settings > Passcode or Settings > Touch ID/Face ID & Passcode and select Turn On Passcode. We recommend that you do NOT use a simple 4-digit passcode. Use either a 6-digit PIN or an alphanumeric passcode.
Encrypting Android Devices
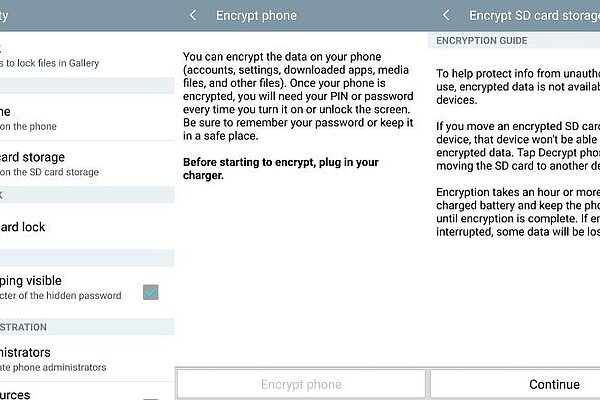
For Android mobiles and tablets running Android 5.0 Lollipop or newer, you can encrypt the device in the “Security” menu in Settings. Getting here might be slightly different depending on your phone manufacturer, but with standard Android this can be found under Settings > Personal > Security.
Here you should see an option to “Encrypt phone” or “Encrypt tablet”. You’ll be asked to plug your phone in to charge while the process takes place, just to make sure that your phone doesn’t shut off and cause errors. If you haven’t done so already, you will be prompted to set a lock screen PIN or password, which you will need to enter when you turn your phone on or unlock it in order to access your newly encrypted files. Be sure to remember this PIN or password.
Android 4.4 or lower
If you’re running a handset with Android 4.4 KitKat or lower, you will have to setup a PIN or password before starting up the encryption process. Fortunately this is simple enough, head on over to Settings > Security > Screen Lock. Here you can either pick a pattern, numbered PIN, or mixed password for your lock screen. This will be the same password used after encryption, so make a note of it.
Once that’s done, you can go back to the Security menu and hit “Encrypt phone” or “Encrypt tablet.” You’ll need to have your phone plugged in and read through the warning messages, and you will almost certainly have to confirm your PIN or password one last time before the encryption process starts.